
 by
by Want to know how to clean bike chain properly at home? Read our complete step-by-step guide with tips, tools needed and common mistakes to avoid for keeping your bike chain in perfect condition.
If you are a bike lover, you already know that a clean and well-lubricated chain is one of the most important things for keeping your motorcycle or bicycle running smooth. A dirty chain not only reduce the performance of your bike but also cause faster wear and tear of the chain, sprocket and other drivetrain components. And replacing all those parts can be very expensive!
The good news is that cleaning your bike chain is not as difficult as it sound. You dont need to take your bike to a mechanic every time the chain get dirty. With some basic tools and a little bit of time, you can easily do it yourself at home. In this blog post at Best Bike Guru, we going to show you exactly how to clean bike chain step by step in the most easiest and effective way possible.
So roll up your sleeves and lets get started!
Why Cleaning Your Bike Chain is So Important?
Before we jump into the cleaning process, lets first understand why chain cleaning is such a big deal. Your bike chain is constantly exposed to dust, dirt, mud, moisture and old grease. Over time, all this gunk build up inside the chain links and create a thick, sticky layer of grime that slow down the chain movement and increase friction.
When your chain is dirty and dry, here is what happen:
- Reduced performance – Power from engine or pedaling is not transferred efficiently to the rear wheel
- More fuel consumption – Your engine have to work harder to move the bike
- Chain stretching – Dirt act like sandpaper inside the links and cause premature chain wear
- Sprocket damage – A worn chain damages front and rear sprocket which are even more expensive to replace
- Noisy ride – Dirty chain make a horrible grinding or squeaking noise that is very irrating to hear
So as you can see, chain maintanence is not optional it is absolutely necessery for every bike owner. Experts recommend cleaning your bike chain every 500 to 700 km or whenever you notice it looking very dirty or dry. Ride in dusty or muddy conditions? Clean it more frequently.
Things You Need Before Cleaning
Before we start the actual cleaning process, gather all the necesary items. You dont want to be running around the house mid-cleaning with dirty hands!
Here is what you will need:
- Chain cleaner solution or kerosene (both work well)
- Old toothbrush or chain cleaning brush
- Clean dry cloth or rags (old t-shirt works great)
- Chain lube (very importent do not skip this!)
- A small bucket or container
- Gloves (optional but highly recomended chain grease is very difficult to remove from skin)
- Chain cleaning tool (optional but make the job much easier)
- Paddock stand or centre stand (to keep rear wheel elevated)
If you have a dedicated chain cleaning tool, the process become much faster and more thorough. These tools are available for just ₹150 to ₹400 at most bike accessory shops and online. We highly recommend getting one if you plan to clean your chain regularly.
Step by Step Guide How to Clean Bike Chain
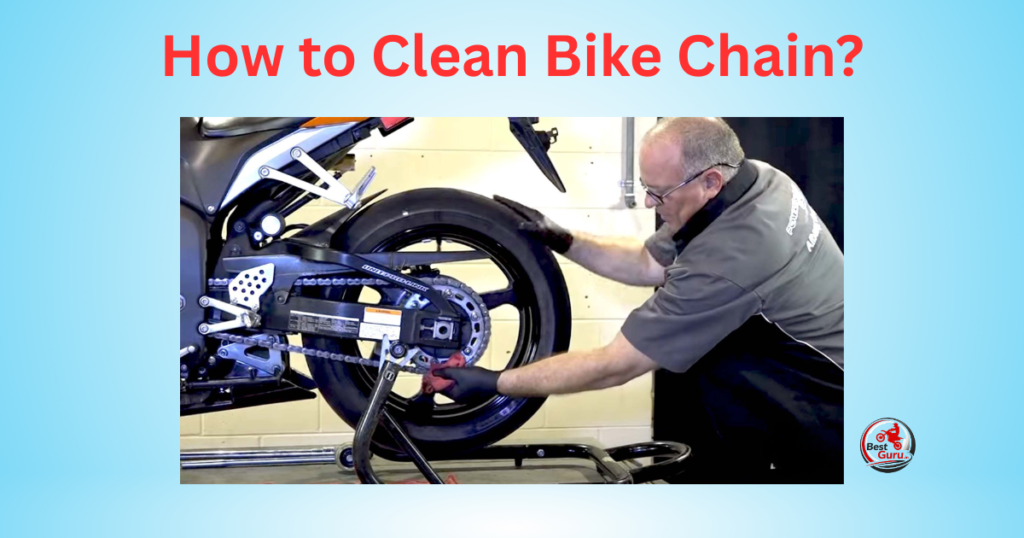
Step 1 : Park the Bike on Centre Stand
First thing first put your bike on the centre stand or paddock stand so that the rear wheel is lifted off the ground. This allow the rear wheel to spin freely which make it much easier to clean all part of the chain. If your bike dont have a centre stand, ask someone to hold it upright while you work.
Make sure you park on a flat surface and the bike is stable before starting. We dont want any accidents!
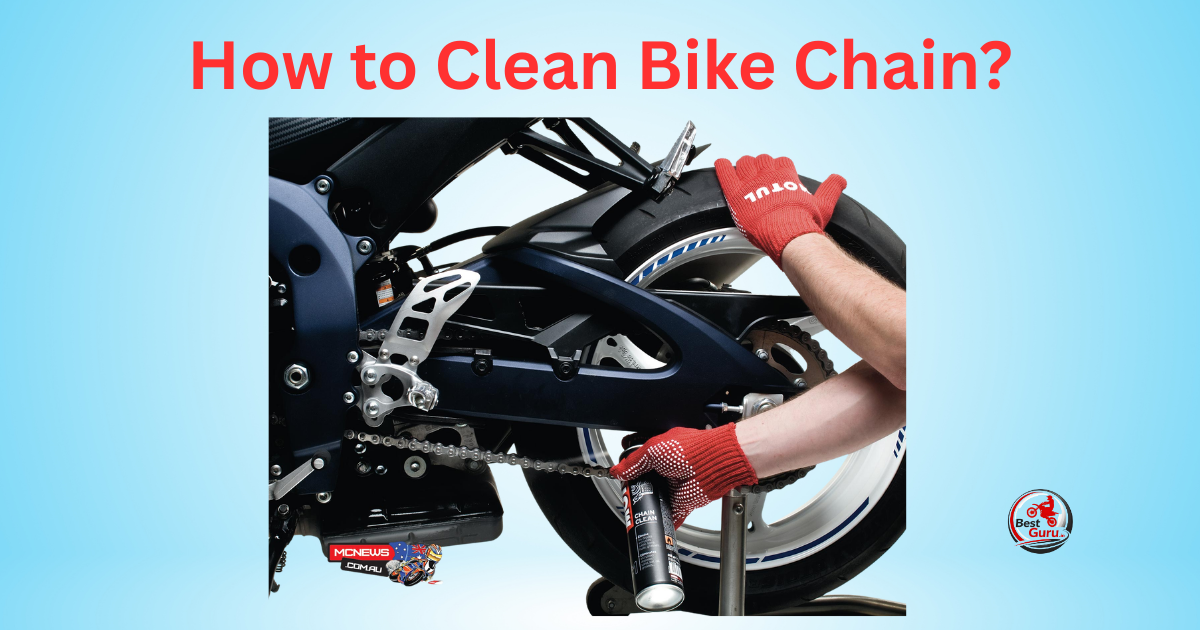
Step 2 : Apply Chain Cleaner or Kerosene
Now take your chain cleaner solution and apply it generously all over the chain. If you are using kerosene, pour some in a small container and use a brush to apply it on the chain. Kerosene is a excellent degreaser and it break down the old grease and dirt very effectively. It is also very cheap and easily available.
If you have a chain cleaning tool, this is the step where you use it. Fill the cleaning tool with chain cleaner, clip it onto the chain and then slowly spin the rear wheel. The brushes inside the tool will scrub the chain from all sides as it pass through. It is very satisfying to use and get the chain much cleaner then doing it manually.
Let the cleaner sit on the chain for 2 to 3 minutes so it can properly break down the old grime and grease.
Also Read : Honda SP 125 New Model 2026 : Price, Features, Mileage & Full Review
Step 3 : Scrub the Chain Thoroughly
After the cleaner has had time to soak in, take your old toothbrush or chain brush and start scrubbing the chain. Make sure you scrub:
- The outer side plates of the chain
- The inner side plates
- The rollers (the round parts that sit on the sprocket teeth)
- The links where dirt and old grease accumulate the most
Spin the rear wheel slowly with one hand while brushing with the other hand so that you clean the entire chain and dont miss any section. You will be surprise how much black gunk come off thats all the dirt and old oil that was slowing down your chain!
For very dirty chain, you may need to repeat this step two or three time to get it properly clean. Dont rush this step thorough scrubbing make a big diffrence.
Step 4 : Wipe Down the Chain
Once you are happy with the scrubbing, take a clean dry cloth and wipe down the entire chain while slowly spinning the rear wheel. This remove all the loosened dirt, old grease and cleaning solution from the chain surface.
Make sure you wipe all side of the chain top, bottom and sides. Keep wiping until the cloth come away relatively clean. If the cloth is still very black after wiping, do another round of scrubbing and wiping.
At this point your chain should look significantly more cleaner and lighter in colour compared to when you started. If you can still see thick grime in the links, repeat Step 2 and Step 3 once more.
Step 5 : Let the Chain Dry Completely
This step is very importent and many people skip it let the chain dry properly before applying lube. If you apply lubricant on a wet chain, the lube will not stick properly and will wash off very quickly making the whole cleaning exercise pointless.
You can leave the chain to air dry for 10 to 15 minutes. To speed up the drying process, you can also use a dry cloth to wipe it down one more time or use a air blower if you have one.
Step 6 : Apply Chain Lubricant
This is the most crucial step of the entire process! A clean chain without lubrication is almost worse than a dirty chain because metal-to-metal contact without any lubrication cause very rapid wear.
Take your chain lube and apply it slowly to the inner side of the chain while rotating the rear wheel. Apply lube on each link one by one dont just spray it randomly all over. Make sure the lube get inside the chain links where it is most needed.
After applying, let it sit for 2 to 3 minutes so the lubricant can penetrate deep inside the chain links. Then take a dry cloth and gently wipe off any excess lube from the outer surface of the chain. Excess lube on the outside only attract more dirt and make your chain get dirty faster so dont over-lubricate!
Pro Tip: Always use a quality chain lube designed for bikes. Using engine oil, cooking oil or WD-40 as chain lube is a very common mistake. These does not provide proper long-term lubrication and can actualy damage your chain faster. Use a proper dedicated chain lubricant only.
Step 7 : Check Chain Tension (Bonus Step!)
While you have the bike on the stand and everything is clean, this is also a great time to quickly check the chain tension. A properly tensioned chain should have about 25 to 30mm of free play when you push it up and down at the midpoint between front and rear sprocket.
If the chain is too loose or too tight, adjust it as per your bike’s service manual. Riding with improper chain tension can damage the chain, sprocket and even the engine output shaft.
Also Read : Honda Shine Electric Bike : Price, Launch Date, Features & Full Details
Common Mistakes to Avoid When Cleaning Bike Chain
- Using WD-40 as lubricant : WD-40 is a water displacer, not a lube. It will dry out your chain very fast
- Not drying chain before lubing : Wet chain + lube = lube sliding right off
- Over-lubricating the chain : Excess lube attract more dirt and create more mess
- Using harsh chemicals : Strong acids or acetone can damage the chain O-rings and seals
- Skipping cleaning too long : Dont wait until chain is completly black and squeaking before you clean it
- Not wearing gloves : Chain grease stain is extremly difficult to remove from hands and clothes
How Often Should You Clean Your Bike Chain?
Here is a simple guideline to follow:
- Normal city riding: Clean every 500-700 km
- Dusty or rural roads: Clean every 300-400 km
- After riding in rain or mud: Clean immediately after the ride
- Long highway trips: Clean before and after the trip
If you ride everyday, a quick wipe with dry cloth after every ride and a proper deep clean every 2 to 3 weeks is a very good practice to follow.
Cleaning your bike chain is one of the simplest and most effective things you can do to extend the life of your bike and keep it performing at its best. It take only 20 to 30 minutes of your time and cost almost nothing yet it can save you thousands of rupees in chain and sprocket replacement costs down the line.
We hope this step-by-step guide on how to clean bike chain was helpfull for you. Follow these steps regularly and your chain will last much longer, your bike will run much smoother and you will save a lot of money on maintanence.
At Best Bike Guru, we always say a happy chain make a happy bike! Happy riding everyone!
how to clean bike chain FAQ
How often should I clean my bike chain?
For normal city riding, you should clean your bike chain every 500 to 700 km. If you ride on dusty, muddy or wet roads, clean it more frequently around 300 to 400 km. After riding in heavy rain or mud, always clean the chain immediately. Dirt and moisture together can cause rust very quickly if ignored.
Can I use WD-40 to clean and lubricate my bike chain?
Yes, WD-40 can be used for cleaning, but not for lubrication. It works well to remove old grease and dirt. However, WD-40 is a water displacer, not a proper lubricant. It dries quickly and leaves the chain unprotected. Always apply a dedicated chain lube after cleaning.
What is the best chain cleaner to use at home?
You can use dedicated chain cleaner sprays like Motul C1, Wurth or Muc-Off. These are the best options. Kerosene is also very effective, cheap and easily available. Diesel works similarly. Petrol cleans fast but should be used carefully as it is flammable. For most home users, kerosene is the most practical choice.
How long does it take to clean a bike chain properly?
A proper chain cleaning session usually takes 20 to 30 minutes. This includes applying cleaner, scrubbing, wiping, drying and lubricating. With a chain cleaning tool, it may take around 15 to 20 minutes. Proper cleaning takes time but helps extend chain life.
Do I need to remove the chain to clean it?
No, removing the chain is not necessary for regular cleaning. Most people clean it while it is on the bike. Simply put the bike on centre stand, apply cleaner and scrub while rotating the rear wheel. Only in extreme dirt cases should you remove and soak it in kerosene for deep cleaning.